2021年10月31日日曜日

JBL 375ドライバーダイアフラム交換&センター出し、JBL LX5&3145ネットワーク作業 JBL 375 driver diaphragm replacement and re-centering, JBL LX5 and 3145 crossover work


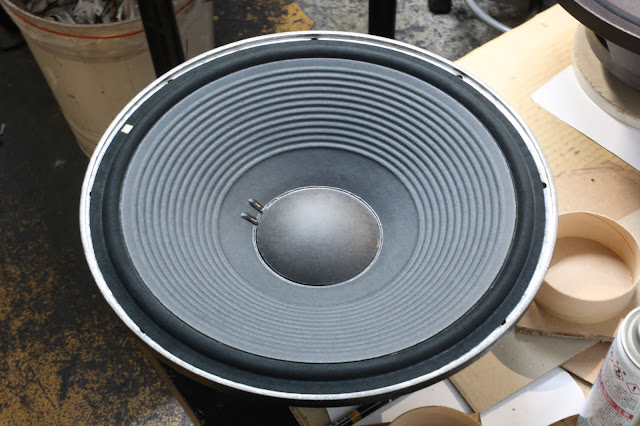
この写真はJBL 375ドライバーのダイアフラム交換およびセンター出しの作業を行っている様子です。代表の細井が自ら音を聞きながらダイアフラムの位置を調整します。とても微細な作業ですので時間がかかります。
This is a photo of the JBL 375 diaphragm replacement and re-centering procedure. Our president Hosoi himself will do the re-centering process. It is done by adjusting it's position with the sound signal coming through, and is not an easy thing to get it in it's best position.


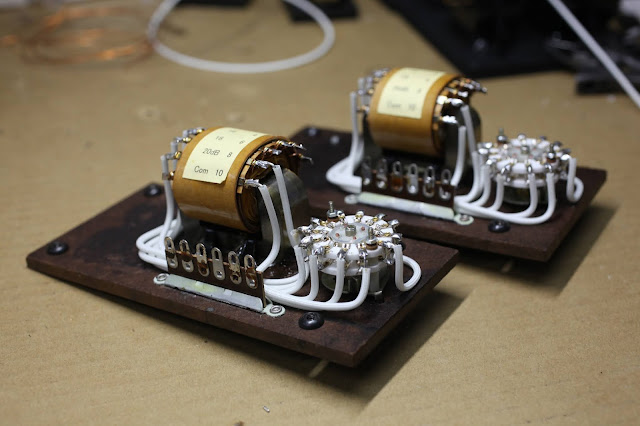
これは作業中のJBL LX5です。配線も進み、背面端子プレートに端子とロータリースイッチを取り付けました。ロータリースイッチ、各端子とコンデンサーボードを借り配線で繋ぎ、測定を行います。測定が終わり次第、キャビネット内に組み込んで配線を行い、コイルの取り付け向きのテストを行います。
This is the JBL LX5 that I am working on now. I have proceeded with the wiring and placed the terminals on the rear panel. I will temporarily connect the parts and the rear panel to test it's filter characteristics. After the test is finished I will place them into the cabinet and test the positioning of the filter coils.


こちらは次に作業予定のJBL 4345用ネットワークです。作業開始前に現在のフィルター特性の測定を行います。測定を終えたら、ネットワークの分解、パーツ交換およびクリーニング作業を開始します。
These are the JBL 4345 crossovers that I will be working on next. I will test it's filter characteristics before doing any work on them. Then, I will start to disassemble and start to change the parts and clean the panels.

作業中のJBL LX5ネットワーク、2245Hウーファー JBL LX5 crossovers, and 2245Hwoofers being worked on

現在JBL C51 Apolloに搭載するLX5ネットワークの作業を進めています。まず分解して、再塗装を行い、外観を綺麗に仕上げます。外側が出来上がったら次は各パーツの準備にかかります。パーツが多いため今回は純正のネットワークケースは使用せずに、パーツを取り付けるプレートを作り、配置していきます。
I am currently working on LX5 crossovers for the JBL C51 Apollo. First I will disassemble, and repaint and refinish the exterior. The, I will start preparing the components. Due to the volume of the components, we will make a board to place them, and not use the original steel casing.


こちらは分解中の背面端子プレートです。
This is the rear panel being disassembled.


これが決定したパーツの配置です。接着を終えて、配線を進めている状態です。コイルの取り付け方向だけは最後に実際にスピーカーに組み込んでから決定します。
This is how the parts were decided to be placed on the board. I have glued them on, and am proceeding with the wiring. The positioning of the filter coil will be determined afterwards, because they need to be tested with the speakers assembled.


こちらは現在作業中のJBL 4345に使用する2245Hウーファーです。当社オリジナルのクロスエッジに交換をしている様子です。
These are JBL 2245H woofers that will be installed into the 4345s that we are working on now. The surrounds are being replaced to cloth material.

2021年10月20日水曜日

JBL 4312B、C37Rhodes完成、JBL D131マグネットの様子、KRS USBアイソレーター完成間近 JBL 4312B, C37 Rhodes completed, JBL D131 magnets, and our original KRS USB Isolator almost complete


以前から、紹介しているJBL 4312Bカスタムの背面へのコイル取り付け作業が完了しました。代表による最終音質チェックを終えれば、完成となります。
The custom JBL 4312Bs that I have been posting on this blog, has been completed as I placed the inductors on the back of the speakers. Our president will check it's sound one last time, and they will be fully finished.


こちらはピアノブラック仕様のJBL C37 Rhodesです。スピーカーが組みあがりましたので、これから周波数特性を測定します。通常の床置きする時の姿からは天地逆さまにして、天吊りしてインストールする予定です。
These are piano black JBL C37 Rhodes. The speakers have been assembled, so I will test it's frequency characteristics. They will be hanged from the ceiling, upside down from it's normal position standing on the ground.


この写真は現在作製中のJBL 4311カスタムに使用予定のJBL D131です。再着磁を終えましたので、これから当社オリジナル開発のコーン紙、クロスエッジを使ってリコーン作業を進めていきます。
These are JBL D131 magnets that we will be using for the custom JBL 4311s that we are making now. They have been re-magnetized, so we will proceed with the re-coning process, using our originally developed cone and cloth surrounds.


こちらは以前作業中の様子を紹介した当社オリジナルのUSBアイソレーターです。間もなく完成します。
This is our original USB isolator, which is almost complete.


現在進めているJBL 4301カスタム用ネットワーク作業、 本日から開始するJBL LX-5のアップグレード作業 Custom JBL 4301 crossover work and JBL LX-5s that I will start today


こちらの写真は現在作製中のJBL 4301カスタムに使用するネットワークの作業です。キャビネット外部に取り付けるフィルター用ファインメットカットコアコイル以外の配線(コンデンサー、ロータリースイッチ)を終えました(4N純銀単線使用)。これから仮配線で全てのパーツを繋ぎ、フィルター特性を測定します。異常がないことの確認が取れたら、いよいよキャビネットへの取り付け作業を開始します。
These are the crossovers for the custom JBL 4301s that we are working on. I have wired(4N pure solid silver) every component(capacitors, rotary switch, etc.) except for the Finemet cut core filter inductors. I will wire them using clips and test it's filter characteristics. After confirming there are no problems, I will start to install them into the speaker cabinet.


これは本日から作業を開始するLX-5ネットワークです。行う作業はコンデンサー交換(Mundorf EVO SilverGold Oil)、抵抗交換(Mundorf MResist SUPREME)、そして全ての端子を金メッキ端子へと交換します。作業を開始する前にまず現状のフィルター特性を測定し、分解作業に入ります。
These are the JBL LX-5 crossovers that I have started working on today. I will replace the capacitors(Mundorf EVO SilverGold Oil), resistors(Mundorf MResist SUPREME), and the terminals to gold plated terminals. I will take the frequency filter characteristic data before I start disassembling it.

2021年10月11日月曜日

突き抜ける音の透明感!ケンリックサウンド・ピアノブラック JBLローズ 天吊りインストール準備  JBL C37 Rhodes Ceiling Mounted Style is being Ready


これより、とあるクラブの天井へ取り付けることとなる、JBL C37 Rhodes 新品精巧リプロダクトのピアノブラック仕様ができあがりました。

本来の床置き姿とは天地逆さまにして、脚の取り付け場所へ天吊り用アイボルトを留めてあります。天井に打ったケミカルアンカーへ、チェーン経由で吊り下げる予定です。

事前に一曲試聴した様子が上記動画です。突き抜けるような透明度高い音が特徴ですね。

細かなスペックは、ウォールナット外装の「異次元音質 JBL C37 Rhodes ローズ 新品精巧リプロダクト 純銀単線配線 超豪勢ネットワーク&マリングレード米松合板」商品ページをご参照ください。

純銀単線配線や、超豪勢ネットワーク&マリングレード米松合板という贅沢な作りです。

2021年10月10日日曜日

JBL 4311カスタム用ネットワーク作業、JBL 4301ネットワーク配線開始、JBL LE15Hエッジ、ダンパー交換完了 Custom JBL 4311 crossover work, JBL 4301 crossover wiring has started, JBL E15H surround and spider replacement


こちらは現在作製中のJBL 4311カスタム用ネットワークです。最近紹介したJBL 4311カスタムや4312Bカスタムと同じ仕様で作っています。各パーツの配線を進めています。
These are the crossovers for the custom JBL 4311s. They are being made with the same specifications as the custom JBL 4311s and 4312Bs that I have been posting recently. I am proceeding with the wiring work.


この写真は同時に作業を進めているJBL 4301カスタムに使用するネットワークです。全てのパーツを取り付け終え、4Nの純銀単線による内部配線を行っている途中です。1本でも配線の取り付け方向を間違えると音質がガラッと変わってしまうため、慎重に進めていきます。
These are the crossovers for the custom JBL 4301s that we are working on now. I have placed all the parts in place, so I have started to wire them using 4N silver wires. If I mistake any one of the silver wire's polarity, the sound will drastically be effected in a bad way, so I must be extra careful.


これはウルトラスエードエッジ交換、ダンパー交換、ボイスコイルセンタリングを終えたJBL LE15Hです。ダンパーの交換はエッジを交換する際でないと出来ませんので、少しでも劣化が見える場合には是非おすすめの項目です。
This is a JBL LE15H that we have changed the surrounds, spiders, and re-centered the voice coil. The spiders can only be changed when we replace the surrounds, so if there are any signs of deterioration, we recommend you replace them to new ones.

JBL 1500FE クロスエッジ交換、JBL ME-150Hウルトラスエードエッジ交換、JBL 4311カスタム、4301カスタム用ネットワーク JBL 1500FE cloth surround replacement, JBL ME-150H Ultrasuede surround replacement, Custom JBL 4311, 4301 crossover work


こちらの写真は現在作業中のJBL 4348に搭載する15インチウーファーのJBL 1500FEです。当社オリジナルのクロスエッジへ交換をし、ボイスコイルのセンタリング調整を行ったので、これから最終プロセスである音質チェックと、インピーダンスデータの測定を行います。
This is a JBL 1500FE 15inch woofer for the JBL 4348s we are making now.. We have changed the surrounds to our original cloth material and re-centered the voice coil position. It will go through the final process of sound quality and impedance tests.

これはウルトラスエードエッジ交換を終えたJBL ME-150Hです。こちらもエッジ交換と同時にボイスコイルセンタリングを終えました。
This is a JBL ME-150H that we changed the surrounds to our Ultrasuede surrounds. It's voice coil has been re-centered during the surround replacement process.


これは現在作製中のネットワークたちです。JBL 4301カスタムとJBL 4311カスタム用のものです。
These are the crossovers that I am working on. They are for custom JBL 4311s and 4301s.


こちらは上記の4301カスタムに仕様するトランス式アッテネータの取り付け作業です。使用するパーツを取り付けるために必要な加工をしなくてはなりません。
It is necessary to process the panel to attach the transformer type attenuators for the 4301s mentioned above.

JBL 4311カスタム完成!JBL 4301カスタムネットワーク作業の進捗 Custom JBL 4311s completed, progress of JBL 4301 custom crossover work


こちらはついに完成したJBL 4311カスタムです。最終周波数特性の測定も終えました。以下、施した内容です。
These are custom JBL 4311s that are finally completed. The final frequency data has been taken also. Below are the work we did on them.

【JBL 4311 カスタム】
・キャビネットピアノポリッシュ
・トランス式アッテネーター新品交換
・CMCスタイル大型金メッキ端子交換
・JBL D131  オリジナル開発コーン紙リコーン 半永久耐性クロスエッジ
・JBL LE5-2 リコーン
・KRS Be20Al アルニコマグネットベリリウム合金ツイーター

[ Custom JBL  4311 ]
*Cabinet piano finish
*Transformer type attenuators
*CMC style gold plated binding posts
*JBL D131 original cone and new cloth surrounds
*JBL LE5-2 re-cone
*KRS Be20Al AlNiCo magnet beryllium alloy tweeter


こちらは現在作製中のJBL4301カスタムに使用するネットワークのパーツです。各パーツの良極性を代表の細井に判断してもらったので、これから各パーツの取り付けを行います。今回は全ての配線を4Nの純銀単線を行います。銀線での配線は気を使う要素がいくつかありますので慎重に作業を進めていきます。
These are the components for the custom JBL 4301s we are making now. The best sounding polarity for each component has been decided by our president, so I will start to assemble them together. We will be using 4N solid pure silver wires for these speakers. There are various aspects you need to be careful with when wiring using pure solid silver wires, so I will proceed with extra care.

2021年10月1日金曜日

JBL 4311カスタム完成まであと少し!JBL 4345オールアルニコ化プロジェクト始動、JBL 4312Bカスタムネットワークも進んでいます JBL 4311custom crossover work almost finished, JBL 4345 all AlNiCo project has begun, JBL 4312B custom crossovers in progress


JBL 4311カスタム用ネットワークの各パーツを取り付け終え、全ての配線も取り付けました。後はコイルの取り付け方向のテストが終わり次第、取り付けて、ネットワーク関係の作業は完了です。
I have placed all of the parts in place, and finished wiring them. After the filter coil's ideal positioning is determined, I will attach that, and the crossover work for these speakers will be complete.


この写真はJBL 4345用ウーファー用の18インチコーン紙の下準備を行っているところです。通常4345のウーファーには2245H(フェライトマグネット)が搭載されていますが、今回はマグネット部分をJBL K151に変更してウーファーのアルニコマグネット化をする予定です。同時にミッドバスもアルニコマグネットの2121に交換します。
This is a photo of an 18 inch cone being prepared to be used for the JBL 4345 woofers. Normally, the 4345 uses a 2245H(ferrite magnet) but this time we are going to change the magnet to a K151 magnet and make it a AlNiCo 18 inch woofer. We will also change the mid-range driver to the 2121s which has AlNiCo  magnets.


こちらはJBL 4312Bカスタム用ネットワークの作業です。コンデンサー、アッテネーター間の配線、各ユニットへ向かう配線を終えましたので、コイル等を仮接続してフィルターの特性を測定します。
These are the JBL 4312B custom crossovers. I have finished wiring the capacitors and the attenuators, so now I will test the filter characteristics.

JBL 4301カスタム用116Aユニット作業、JBL 4311カスタム完成まであと一歩、JBL4312Bカスタムネットワーク組み込み作業 116A woofers for JBL 4301s being worked on, JBL 4311 just one more step to completion, JBL 4312B crossover installation


こちらは現前作成中のJBL 4301カスタムに搭載予定のJBL 116Aです。クロスエッジ交換を終えたので、後はガスケットと取り付けて完成です。今回の4301は昨年末に作製したものと同じ仕様で、ユニットは116A+075の組み合わせ、ネットワークはMundorf Supreme Mcap EVO SilverGold Oilとファインメットカットコアコイル、そしてトランス式アッテネータを使用します。キャビネットに関しては10周年記念KRS4351と同じミッドナイトブルーバッフルの特別仕様となります。
This is a JBL 116A that we will be installing into the custom JBL 4301 s we are making now. The surrounds has been replaced to cloth material, so all there is left to do are the gaskets. These 4301s will be of the same specifications as the ones we made at the end of last year. We will be using the 116A and 075 for the drivers, and as for the crossovers, we are using Mundorf Supreme EVO SilverGold Oil capacitors, finemet cut core inductors, and transformer type attenuators. The cabinets will be featuring the same midnight blue baffle as the10th anniversary KRS 4351s.


この写真は以前から紹介しているJBL 4311カスタムです。代表によるコイル取り付け方向テストを終え、指定の位置に取り付けました。後は再度ユニットを組み込んで完成です。
These are the custom JBL 4311s that I have been working on lately. The coil position has been tested, and placed in it's ideal position. We will place the drivers back in the cabinet, and they will be finished.


こちらは上の4311と同仕様の4312Bカスタムのネットワークをキャビネット内部に取り付けている様子です。
I am installing the crossovers into the custom JBL 4312B cabinets. These speakers are of the same specifications as the 4311s mentioned above.